Wednesday 28 November 2012

Rear suspension and brakes

Rear suspension and brakes

There were no great surprises here after discovering the requirement to have a Hydra mechanical OEM calliper from Rally Design, if you do not use that part then your are on your own in terms of design. Once you know it is used it fits well allowing a 15" wheel but I think anything smaller would be a problem as that calliper although light weight is a big calliper as compared to say a VW golf part.

The suspension all bolts together as described in the build manual. The exception is the handbrake that I had to change the design of because of the GRP racing seat fit. In one of the picture you can see some of the modifications to the universal handbrake cable. I made a nylon bush and brass nipple to make things work smoothly. I had to remove the loop at the end of the handbrake cable as it fouled my alloy wheel rim.


I am not particularly happy with the location of the brake pipe lug so I will have another look at that after the engine fit. The brake pipe could be subject to heat from the exhaust pipe.

References

Contents http://sylvabuild.blogspot.co.uk/2012/01/sylva-j15-is-kit-car-designed-by-jeremy.html

Thursday 22 November 2012

Front suspension and brake assembly

Front suspension and brake assembly


After doing the 4pot Willwood conversion to the Triumph (Caterham) upright earlier in the year it is time to put it all together. The only deviation from design was the rack track rod end extensions. I ordered what I thought were the correct part (rally design  DAR006). When I tried the rack (M2 Escort) the steering geometry towed in excessively but when I added the RD part at minimum adjustment I had excessive tow out. I had a look at the RD part that interfaced with the rack, the last 10mm M14 thread  had been omitted. I ran a bottoming tap down it and all is now well. I still only have  2 turns of adjustment ether end but I recon that is adequate. The usual adjustment is a tad of tow in so the two turns either side will reduce only slightly.

I had endless debate on the Locost forum about providing a locking device for the Hydraulic T at the front and rear. I eventually took a 6mm steel plate, a 6mm bolt, cut the head off the bolt and welded it to the plate after drilling and countersinking the hole.

The brakes are American standard so are the master cylinders  so I used all unf fittings and 3/16 pipe.

I am using the Euroquip flexibles as supplied by RD, unfortunately I ordered one of the parts incorrectly. Hope you have better luck than me!

The pipe  is a Nickle Copper alloy called Kunifer which is much more vibration resistant. It does not work harden to the same extent as copper.


Hopefully my pipe attachments to the chassis will please the IVA man but you can never tell.

References

Contents http://sylvabuild.blogspot.co.uk/2012/01/sylva-j15-is-kit-car-designed-by-jeremy.html

Friday 16 November 2012

The internal panels and floor

The internal panels and floor

The build manual dictates 1mm alloy on the sides and 1.5mm on the floor and foot well bulkheads. The sides are riveted every 50mm and the floor every 40mm all with 4mm alloy type. I used the sealed variety on the floor and exposed areas  and black anodised ones for the sides. and back. I decided to cover all the panels with carbon effect Vinyl.

The passenger foot well I used 2mm tread plate as this doubles as access to the fuel pump.

At this point I discovered a problem with the passenger GRP seat fouling the seat belt anchor at the tunnel. The seats are from MK Sports Cars and are a peculiar asymmetric design such that they have different fitting arrangements passenger and driver side. I will have to investigate this issue further. If necessary I will cut a lump out of the seat.

The rivets count is as follows:

Black headed
Near side outer      50
Near side tunnel    57
Back                      53
Far side tunnel      66
Far side outer        50
Back                      53
Tunnel back          24
Total                    353
Sealed
Floor                  200
Near foot well       40
Far foot well         40
Total                  280

Total at this stage 633

This in my opinion would have taken a long time with a hand riveter so I bought a Chinese copy of an air riveter. It turned out to be a piece of crap jamming about every 5th rivet. At least it was consistent and was good at getting into corners despite it's apparent bulk. I have never had much luck with riveters they appear all prone to jamming. I got supper fast at releasing the jammed tails.

There is probably about another 100 or so more rivets in the build. I must find someone I don't like to give that riveter to when I am finished the build.

Next

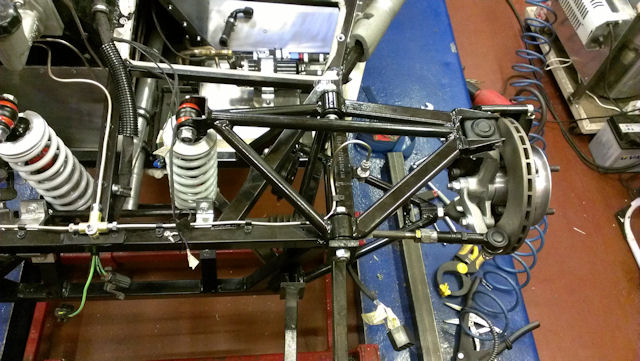
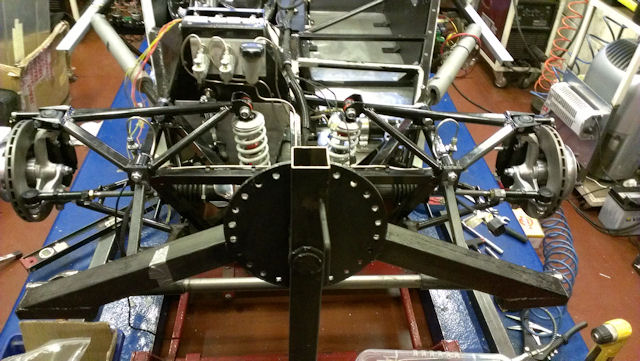
* Build up the suspension front and rear
* Connect up the brakes
* Inset the refreshed engine into the build
* Try to start the engine


The carbon effect vinyl is not universally popular but I think it is better than bare alloy panels and does sort of match the dashboard.

I tried the driving position and it is fabulous, worth all the work, pity about the passenger better be a small person!!!

References

Contents http://sylvabuild.blogspot.co.uk/2012/01/sylva-j15-is-kit-car-designed-by-jeremy.html